
How to recover deleted files on Mac without software? This article will show you 5 practical methods to recover deleted files without third-party software on Mac. But if the files have been permanently deleted, use EaseUS Data Recovery Wizard for Mac to recover them!
During heavy use of electronic devices, you may save a lot of data on your Mac disk, SD cards or USB drives. Imagine that important data stored on your devices is accidentally deleted. you might break out in a cold sweat!
If you want to know how to recover deleted files on Mac without data recovery software, this article can help you. Before you learn how to recover deleted files on Mac without software, you need to know where deleted files go on your Mac – by knowing where a deleted file is, you can learn how to recover it.
Where do deleted files go?
By default, deleted files are moved to the Mac Recycle Bin. Regular deletion simply moves the file to the Recycle Bin, either by right-clicking and selecting Delete, using keyboard shortcuts to move to the Recycle Bin, etc. In this case, you can recover the deleted files on Mac without software using the “Recovery” function. in the Mac Recycle Bin.
When we delete files on Mac, there are cases where they don’t go to the Trash, but are deleted forever, for example, if we empty the Trash, if we use the permanent quick delete key, if we use the Terminal command, or if you clean the hard drive. To recover a permanently deleted file in this way, you must have a backup of important files, otherwise it is impossible.
Or you can use data recovery software to recover them. There are many data recovery programs on the market that can help you, such as EaseUS Data Recovery Wizard for Mac, which recovers permanently deleted files on Mac safely and quickly. Moreover, it also offers a free trial version.
Today we discuss cases where data can be recovered without software, which means how to recover deleted files using conventional methods. Here are 5 practical methods. Take a look !
| 🗑️Restore from Mac Trash | Deleted files will return to their original location. But this method only works within 30 days after the files are deleted. |
| ⌨️Undelete via the Z command | This method is very convenient, but there is a limit to the number of times you can use the undo key combination. |
| 🧩Recovery via Mac Terminal | This method is suitable for users with basic computer knowledge and gives the same results as the first method. |
| 💾Restore backup files | Even if your files are permanently deleted on your Mac, this method still works. However, it has a clear limitation: the deleted files were created either manually or automatically. |
| 📁Restore via Recently Deleted | This method only works with some recoverable Mac apps like Photos, Notes, etc., but it’s worth a try. |
How to recover deleted files on Mac without software
Besides using data recovery software like EaseUS Data Recovery Wizard for Mac, here are 5 quick solutions to recover deleted files on Mac:
Solution 1. Recover deleted files from Mac Trash
This method can solve most deletion cases, in case the deleted files go to the Recycle Bin folder. Follow the steps below to recover deleted files on Mac without third-party software:
Step 1 . Open Terminal on your MacBook, type the command ln -s ~/.Trash ~/Desktop/Trash and press “Enter”.
Or you can click the Recycle Bin icon 🗑️ on your desktop to open the Mac Recycle Bin.
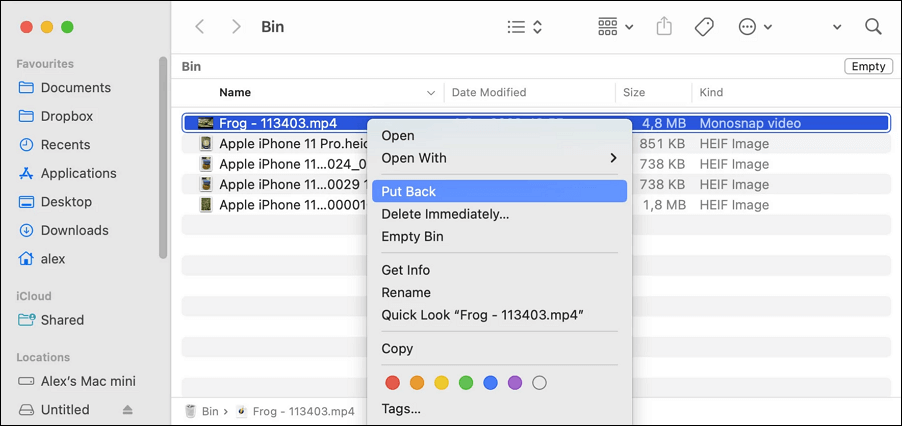
2nd step . Open the Trash folder on your Mac desktop and select the deleted files you want.
Step 3 . Select “Put Back” to restore the deleted files to their original locations.
However, it’s worth noting that the Recycle Bin only keeps deleted files for a maximum of 30 days, so if your files were deleted more than a month ago, you probably won’t be able to recover them from the Recycle Bin.
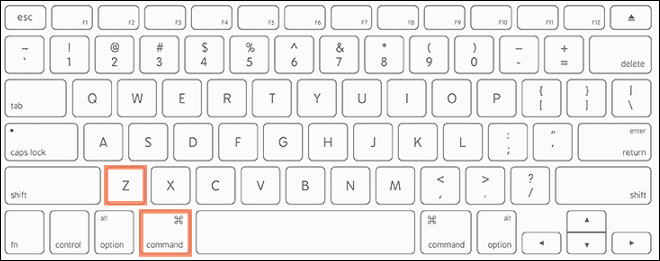
Solution 2. Undelete via Command Z on Mac
The Command + Z shortcut can undo the last delete on macOS, so if you accidentally deleted files, press the “Command” and “Z” keys on your keyboard at the same time. This method is worth trying. However, it will not work after emptying the Recycle Bin.
Once the deleted files are deleted in the Recycle Bin, you have only 2 methods to recover the deleted files: restoring from backups or using third-party software such as EaseUS Data Recovery Wizard for Mac.
If you like shortcuts on Mac, you might be interested in this article: Ctrl + Alt + Del on Mac: 4 Alternative Methods
Solution 3. Recover deleted files on Mac using Terminal
Contrary to what many Mac users believe, it is also possible to recover undeleted files from the Recycle Bin using the Terminal command. Follow the steps below to recover deleted files through Mac Terminal:
Step 1 . Go to Applications > Utilities and double-click to open Terminal.
2nd step . Type cd .Trash and press “Return”.
Step 3 . Type mv filename ../ (replace filename with the name of the deleted file) and press “Return”.
Step 4 . Exit Mac Terminal and open “Finder” to find the recovered file.
Solution 4. Restore files with Time Machine/iCloud/Other backup tools
Let’s say you accidentally deleted important files and emptied the Recycle Bin. In this case, Time Machine, iCloud and other backup tools are recommended to recover the emptied Recycle Bin on Mac. For example, if you turn on the iCloud automatic backup option, congratulations, you can easily download the files you need from iCloud Drive.
Or if you used Time Machine, a handy backup utility built into macOS, to back up your Mac data, you can follow these steps to recover deleted files from Time Machine:
Step 1 . Open Time Machine by clicking the icon in the top menu.
2nd step . Right-click the Time Machine icon and select “Search Time Machine Backups.”
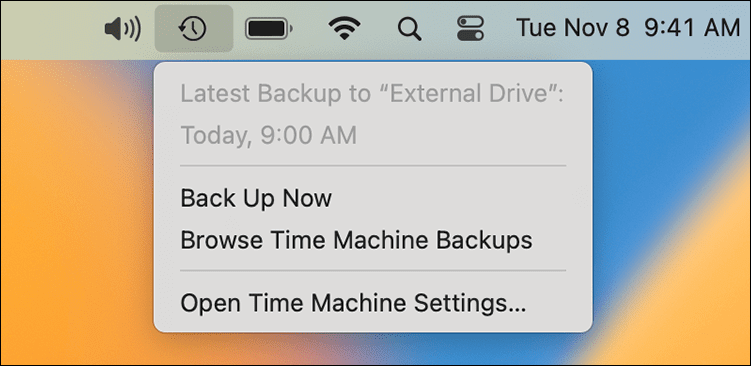
Step 3 . Select a backup that stores the deleted files. Click “Restore” to return the deleted files to their original location.
Note : Restoring from an old Time Machine backup may overwrite the new data on your Mac, so it is recommended that you back up the new data before restoring the deleted data.
Solution 5. Restore files from newly deleted folder
Mac apps like Photos and Notes have a recovery feature, the Recently Deleted folder. Let’s say you deleted a photo in the Photos app. it will be moved to the Recently Deleted folder and stored there for 30 days.
This feature is similar to a small recycle bin in apps and you can restore deleted notes or photos within a limited time. Follow the steps below to recover deleted photos on Mac:
Step 1 . Launch Photos on your Mac and go to “Recently Deleted” on the left side.
2nd step . Select the deleted photo you want and click “Recover” to restore it to the Photos app.
How to Recover Deleted Files on Mac Without Software – Frequently Asked Questions
Here are questions people also ask when looking for how to recover deleted files on Mac without software:
- How can I recover permanently deleted files on my Mac?
Here are two effective ways to recover permanently deleted files on your Mac: If you have backed up the deleted files, you can restore them with those backups. If not, the only way to recover permanently deleted files on Mac is to use professional data recovery software such as EaseUS Data Recovery Wizard for Mac. - Is it possible to recover deleted files from Mac?
It is possible to recover deleted files from your Mac: restore them from the Recycle Bin by clicking “Recover”, recover them with EaseUS Data Recovery Wizard for Mac, restore them from Time Machine backup, undelete using the shortcut “Command + Z” , and so on. - How can I recover permanently deleted files without software?
If you haven’t backed up before or enabled auto-sync to any cloud drive including iCloud, Google Drive, etc., you can recover permanently deleted files from your backups.